User Guide
- 1. Introduction
- 2. Quick Start
-
3. Features
-
3.1 Command Features
-
3.1.1 Viewing help :
help -
3.1.2 Adding an item or delivery:
add-ioradd-d - 3.1.3 Removing quantity from an item:
remove-i -
3.1.4 Editing an item or delivery:
edit-ioredit-d -
3.1.5 Locating items or delivery by keywords:
find-iorfind-d - 3.1.6 Listing all items or delivery:
list-iorlist-d - 3.1.7 Deleting an item or delivery:
delete-iordelete-d - 3.1.8 Clearing all entries:
clear-iorclear-d - 3.1.9 Undo last command:
undo - 3.1.10 Redo last command:
redo - 3.1.11 Exiting the program:
exit
-
3.1.1 Viewing help :
- 3.2 General Features
- 3.3 Coming Soon
-
3.1 Command Features
- 4. FAQ
- 5. Command Summary
- 6. Glossary
1. Introduction
OneShelf is a desktop application for you to manage your restaurant inventories. Additionally, you can also
keep track of deliveries that has yet to be delivered to customers.
It is easy to build and customise your inventories and deliveries by using
only Command Line Interface. If you are a restaurant manager
who prefers to use the Command Line Interface and needs to keep
track of inventory items and pending deliveries, OneShelf is for you.
This User Guide will provide a general overview of installation, current features, and a sneak peek for upcoming features.
2. Quick Start
2.1 Installation Guide
Refer to this video for a quick tutorial on OneShelf Installation Guide:

Installation Steps:
-
Ensure you have Java
11or above installed in your Computer. -
Download the latest
oneshelf.jarfrom here. -
Copy the file to the folder you want to use as the home folder for this application.
-
Double-click the file to start the app. If you are unable to open the file by double-clicking, you may want to install Java SE Platform or you can also open OneShelf using the terminal, refer to the installation guide video above.
-
Refer to the Features below for details of each command.
2.2 How to use OneShelf
OneShelf has 2 main components, namely are:
- Inventory items
- Pending deliveries
From here onwards, the term item and delivery are used specifically for inventory items and pending deliveries respectively.
Inventory items
Inventory items are the items that you want to keep track in your restaurant. The input for inventory items are flexible,
so that you can define the items according to your needs.
Name and Supplier are used to uniquely identify an inventory item.
You can keep track of restaurant items such as chair, frying pan, spoon or even ingredients such as milk, chicken, etc.
All items related commands have a suffix -i.
Pending deliveries
Pending deliveries are deliveries that has yet to be delivered out to customers. Imagine you have received a call from
a customer requesting for a delivery, you can also keep track for all the deliveries’ request.
All delivery orders are unique.
You are able to add multiple delivery orders from the same Name, Phone and Address. There is no duplication in
pending deliveries, unlike inventory items.
Reason: A person have ordered from the restaurant. 10 minutes later, the same person called again to add
a new order. Therefore, we allow you to add different orders even if Name, Phone and Address are already in
the list.
All pending deliveries related command have a suffix -d.
2.3 User Interface Sections
-
Once you have opened OneShelf application, similar GUI shown below (Figure 1) should appear.
Note how the app contains some sample data but the installed version on your desktop might have a different data set.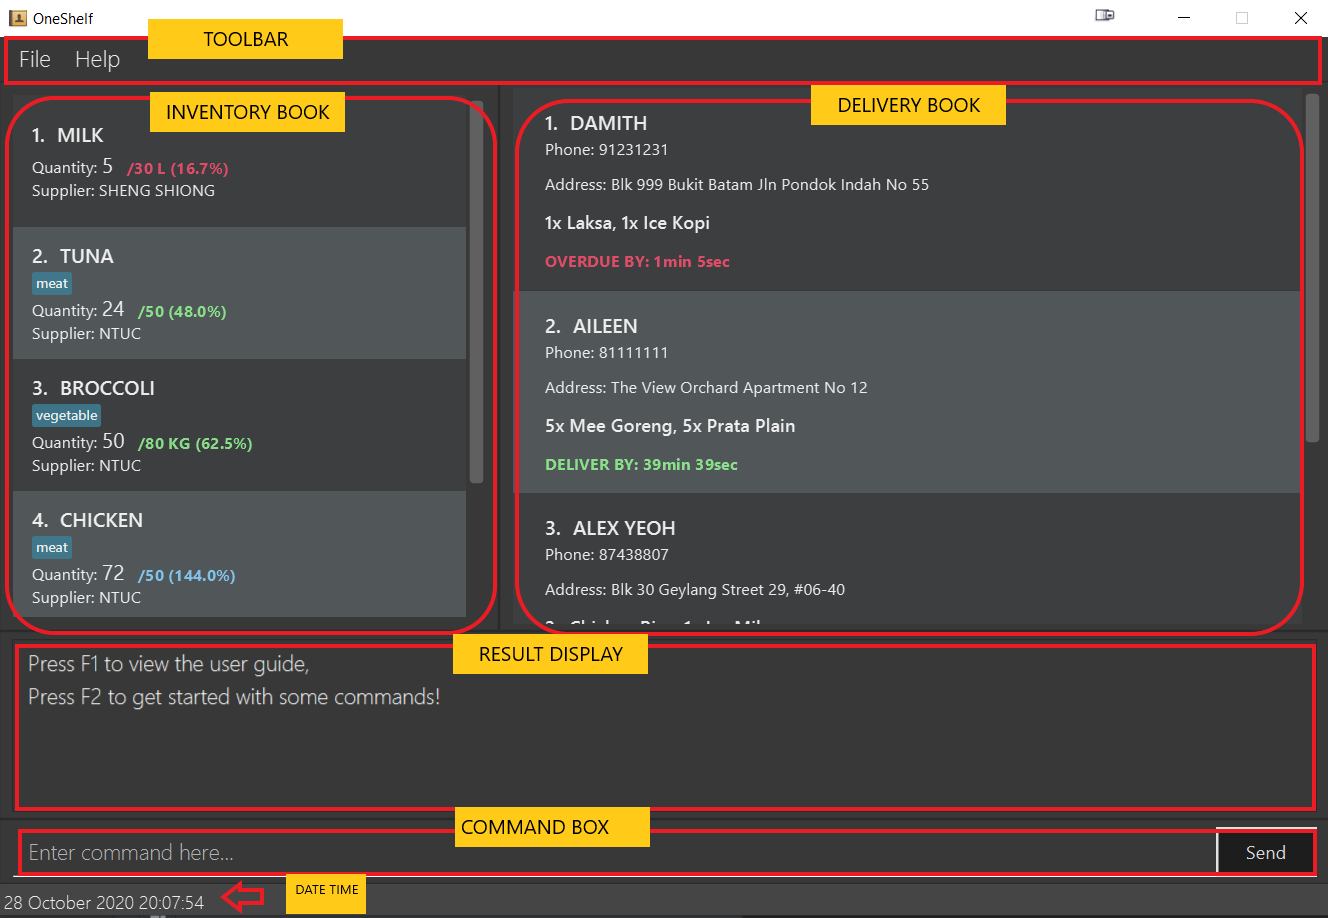
Figure 1: Introduction to OneShelf User Interface
| Component | Description |
|---|---|
| Toolbar | Displays the toolbar options for this application. You can access the different help windows and exit the application. |
| Inventory book | Shows the list of inventory items that you have |
| Delivery book | Shows the list of pending deliveries that you have |
| Result Display | Displays the result of your command |
| Command box | For users to type their commands |
| Date time | Displays the date time at the current moment of viewing |
You may want to refer to the glossary
-
Type the command
help startin the command box and press Enter to execute it.
A new help window shown below (Figure 2) should appear on your desktop. You are strongly encouraged to follow the steps in the help window if you are a new user.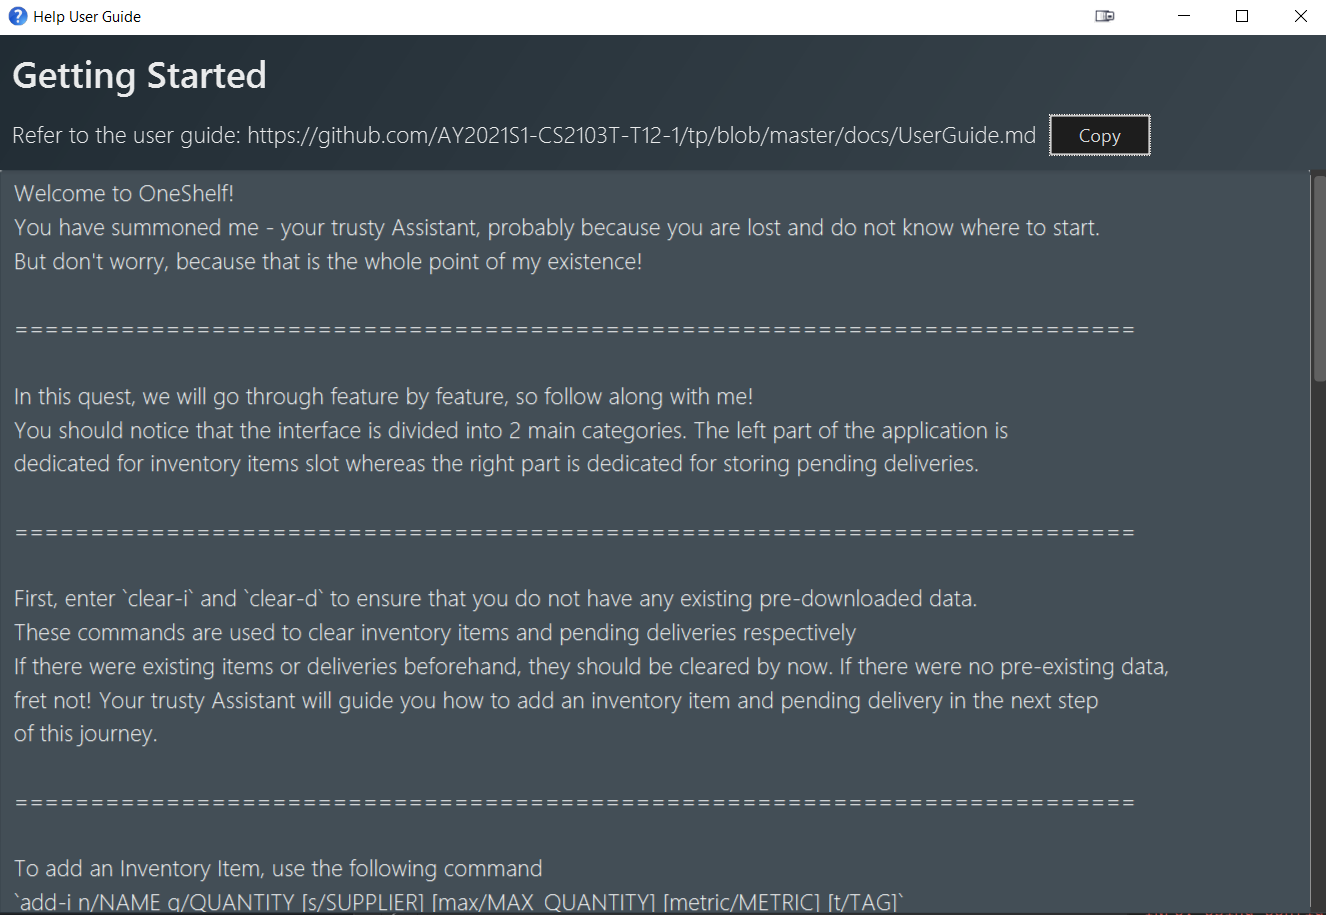
Figure 2: Help Start Window
3. Features
In this section, you can find the different available command features, general features and upcoming features.
3.1 Command Features
Things to note for the commands:
-
Commands with suffix of
-irefer toitemrelated commands, while those with suffix of-drefer todeliveryrelated commands.
e.g.add-iis used to add anitemandadd-dis used to add adelivery -
In the format of commands,
INDEXrefers to the numbering that is displayed.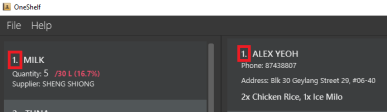
Figure 3: Index Annotation
-
In the format of commands, words in
UPPER_CASEare what you would input.
e.g. for a command with formatadd-i n/NAME q/QUANTITY,
replaceNAMEandQUANTITYwith your input:add-i n/Chicken q/10. - In the format of commands, square brackets are to indicate optional fields. The fields in the square brackets are not mandatory to input.
e.g a command with formatn/NAME [t/TAG]can be used as- either
n/Chicken t/Poultry - or just
n/Chicken
- either
- Items with
… after them can be used multiple times in the same command or not at all.
e.g.[t/TAG]…can be used- once:
t/brother - or multiple times:
t/sibling t/brother t/family
- once:
- Fields in the commands can be in any order.
e.g. a command with formatadd-i n/NAME q/QUANTITYcan be used as- either
add-i n/Chicken q/10 - or
add-i q/10 n/Chicken
- either
-
If you add multiple inputs of the same parameter in a single command, OneShelf will take in the last parameter as the actual input.
e.g.add-i n/Chicken q/10 n/Fish
Notice that in this example,NAMEappears twice in one single command, OneShelf will take Fish as the actual name and ignore Chicken. - The
|symbol means the user must provide at least one of the fields separated by the|
3.1.1 Viewing help : help
3.1.1a help start
If you are a first time user, we strongly encourage you to follow the guide to kick-start your journey in OneShelf.
Format: help start
To open up help start window, you can also do the following:
- Press
F1at any point in the usage of the app - Click on
Helplocated at the top toolbar and then clickStart F1
A new help window similar to Figure 2 should appear on your desktop.
3.1.1b help summary
We understand that even if you are not a first time user, it is not easy to remember all the commands.
Should you require any quick reference of commands, you can enter help summary.
Format: help summary
To open up help summary window, you can also do the following:
- Press
F2 - Click on
Helplocated at the top toolbar and then clickSummary F2
A new help window similar below (Figure 4) should appear on your desktop.
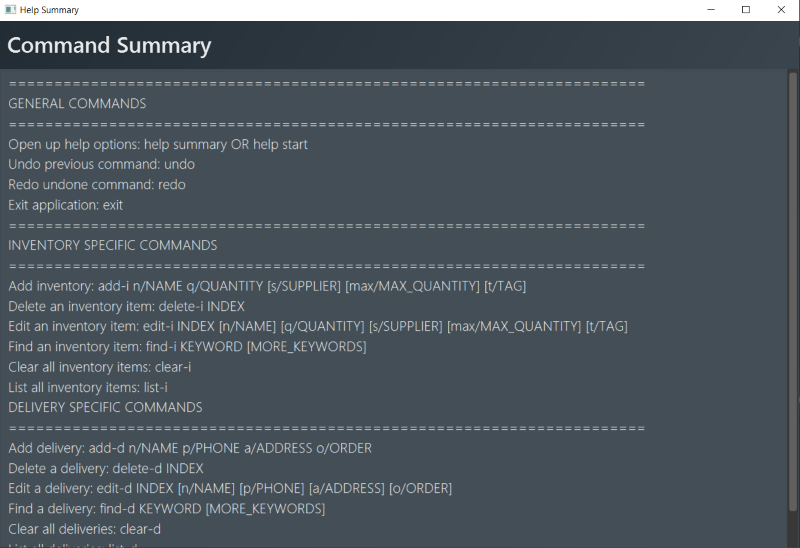
Figure 4: Help Summary Window
3.1.2 Adding an item or delivery: add-i or add-d
Adds inventory item or pending delivery to OneShelf.
3.1.2a add-i
Format: add-i n/NAME q/QUANTITY [s/SUPPLIER] [max/MAX_QUANTITY] [metric/METRIC] [t/TAG]...
Pointers to take note when adding an item:
- If item does not exist in the inventory book, then a new item will be added.
- If similar inventory item already exist, then the
QUANTITYof that particular item will be increased. - An item which has the same
NAMEandSUPPLIERis considered similar. -
MAX_QUANTITYdenotes the ideal stock level of that particular item. -
TAGcould be used to categorise items. EG: Duck can be tagged as meat.
Note: MAX_QUANTITY is not a hard cap on the amount of an item you can store in the inventory.
Example 1: Add an item using Figure 1 data set as the starting point.
-
Type
add-i n/DUCK q/10 s/NTUC max/50 metric/KG t/meat t/foodin the Command Box. -
Either press Enter on your keyboard or click Send to execute the command.
-
The new item will show up in Inventory Book, refer to Figure 5:
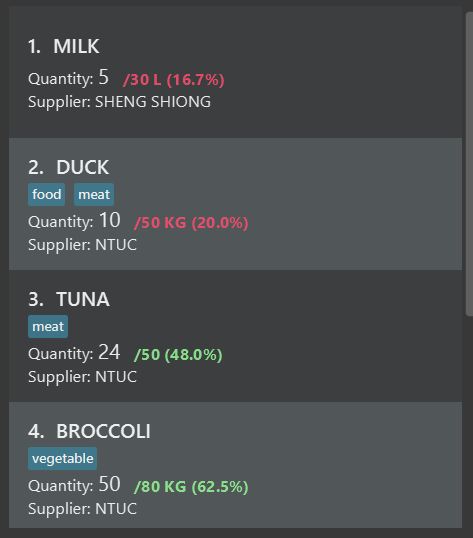
Figure 5: Add new item of duck
-
Press key arrow up on your keyboard to toggle to previous command and press Enter. You should receive an error message, refer to Figure 6:
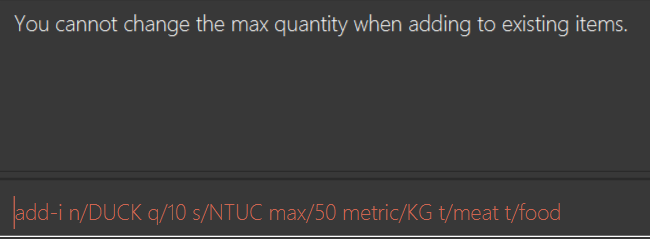
Figure 6: Error for invalid input
Your command should not pass through as you are not allowed to add an existing item with max quantity and metric.
Note: If you want to edit the maximum quantity or metric of an existing item, refer to edit feature
-
Repeat step 1 and 2 above but with the command:
add-i n/DUCK q/10 s/NTUC t/perishable. You can refer to Figure 7 for the expected result: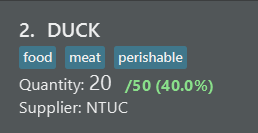
Figure 7: Successfully added quantity with new tag
Notice that you are adding to an existing
itemDUCK which was just added. A new tag of perishable should also appear.
An item can have any number of tags (including 0) and adding exactly the same tag to an existing item will not result in duplicated tags
3.1.2b add-d
Format: add-d n/NAME p/PHONE a/ADDRESS o/ORDER [by/TIME]
Pointers to take note when adding a delivery:
- You can add a delivery even if the same
Name,PhoneandAddressalready exists in the delivery book. - Unit of
Timeis minutes ie.add-d n/JASON p/91111111 a/Blk 251 Orchard Road o/Nasi goreng x1 by/15indicates that this order needs to be delivered out in 15 minutes.
Example 1:
-
Type
add-d n/JASON p/91111111 a/Blk 251 Orchard Road o/Nasi goreng x1. -
Either press Enter on your keyboard or click Send to execute the command.
-
You should now see a new pending delivery with a default
deliver byof 30 minutes, you may want to refer to Figure 8: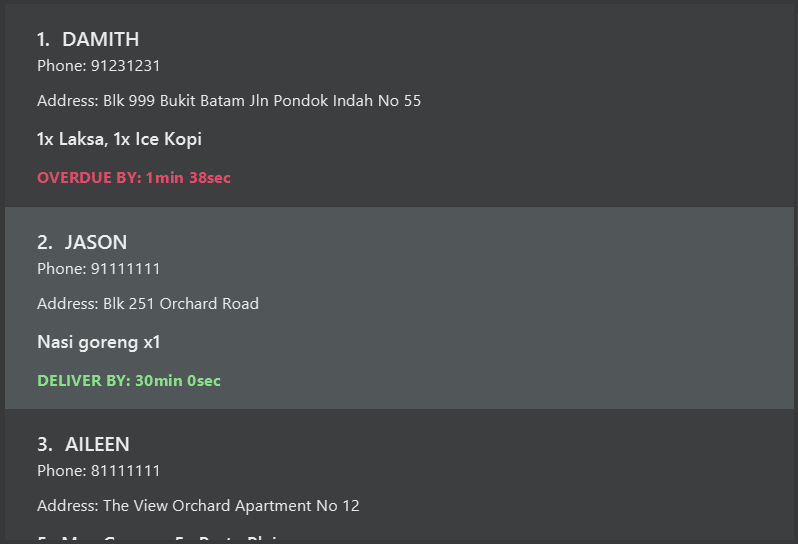
Figure 8: Added Jason’s delivery
Example 2:
-
Repeat step 1 and 2 as above but with the command:
add-d n/HUGO p/91123421 a/Blk 253 BUKIT TIMAH o/Fish fillet x1 by/10. -
You should now see a Hugo’s delivery with
deliver byof 10 minutes, you may want to refer to Figure 9 below: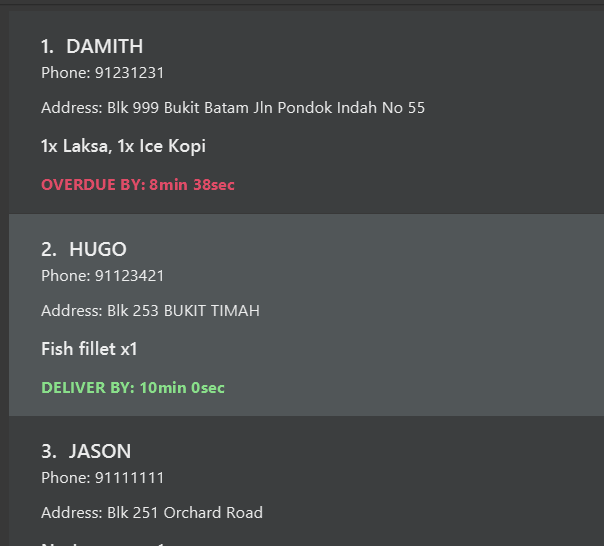
Figure 9: Added Hugo’s delivery
Pending deliveries are automatically sorted based on their
deliver by time and unlike inventory item, pending delivery does not have a quantity
3.1.3 Removing quantity from an item: remove-i
Removes a specified quantity of an existing item from OneShelf.
Format: remove-i INDEX q/QUANTITY
Pointers to take note when removing an item’s quantity:
- Subtracts
QUANTITYfrom the current quantity of an item at the specifiedINDEX. The index refers to the index number shown in the displayed item list. The index must be a positive integer 1, 2, 3, …
Example 1: remove-i 2 q/10 using Figure 1 as the starting point.
-
Select the Command Box and type in
remove-i 2 q/10. -
Either press Enter on your keyboard or click Send to execute the command.
-
Success Message will be shown in the Result Display and the 2nd item will show up with its updated fields, refer to Figure 10.
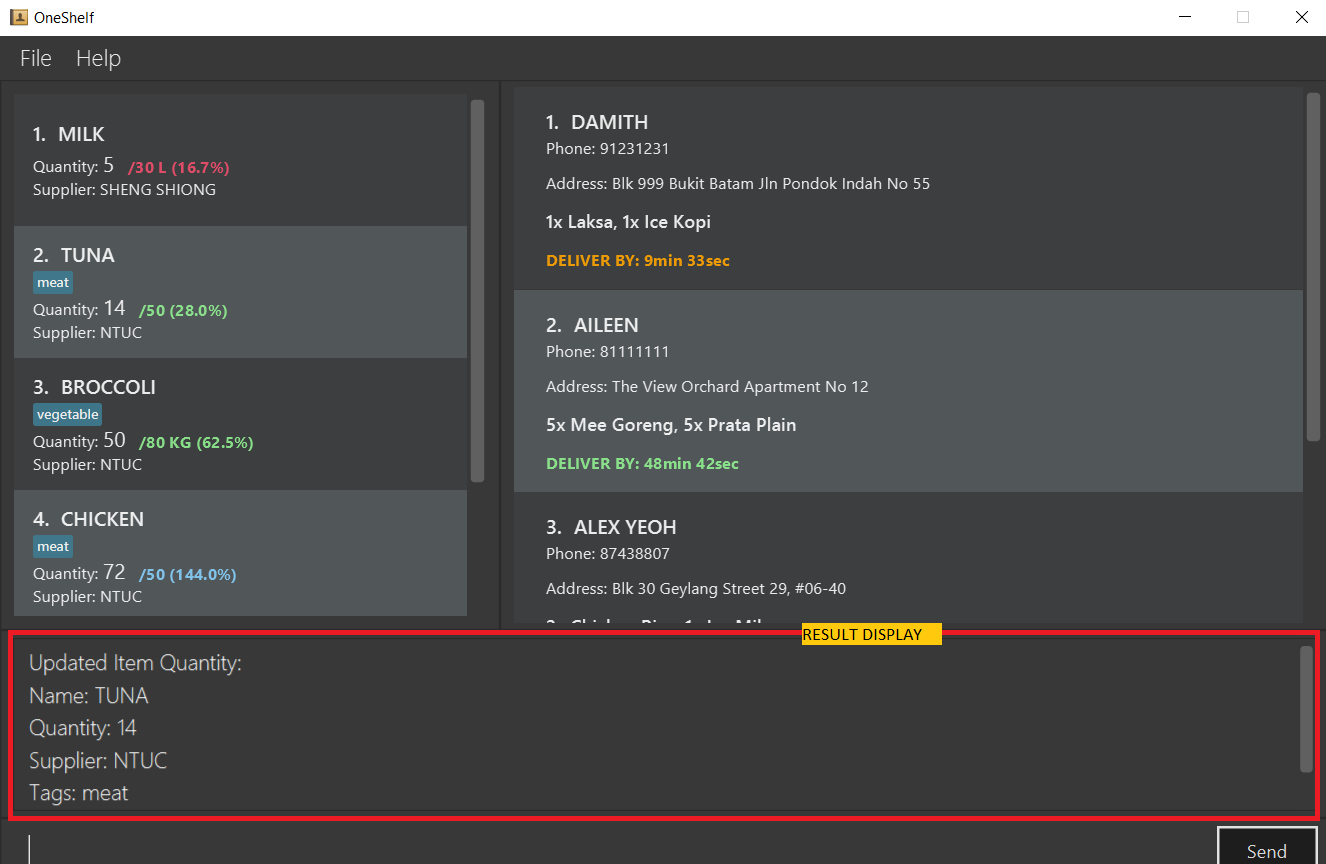
Figure 10: Remove 10 quantity from Tuna Result
There is no remove-d since a pending delivery does not have a quantity
3.1.4 Editing an item or delivery: edit-i or edit-d
Edits an existing item in the Inventory book or an existing pending delivery in the Delivery book.
3.1.4a edit-i
Format: edit-i INDEX [n/NAME | q/QUANTITY | s/SUPPLIER | max/MAX_QUANTITY | t/TAG…]
Pointers to take note when editing an item:
- Edits the item at the specified
INDEX. The index refers to the index number shown in the displayed item list. The index must be a positive integer 1, 2, 3, … - Updates the components of an item.
- When editing tags, the existing tags of the item will be removed
- You can remove all the item’s tags by typing
t/without specifying any tags after it.
Example 1: edit-i 3 n/CARROTS q/50 using Figure 1 as the starting point.
-
Select the Command Box and type in
edit-i 3 n/CARROTS q/50. -
Either press Enter on your keyboard or click Send to execute the command.
-
Success Message will be shown in the Result Display and the 3rd item will show up with its updated fields, refer to Figure 11.
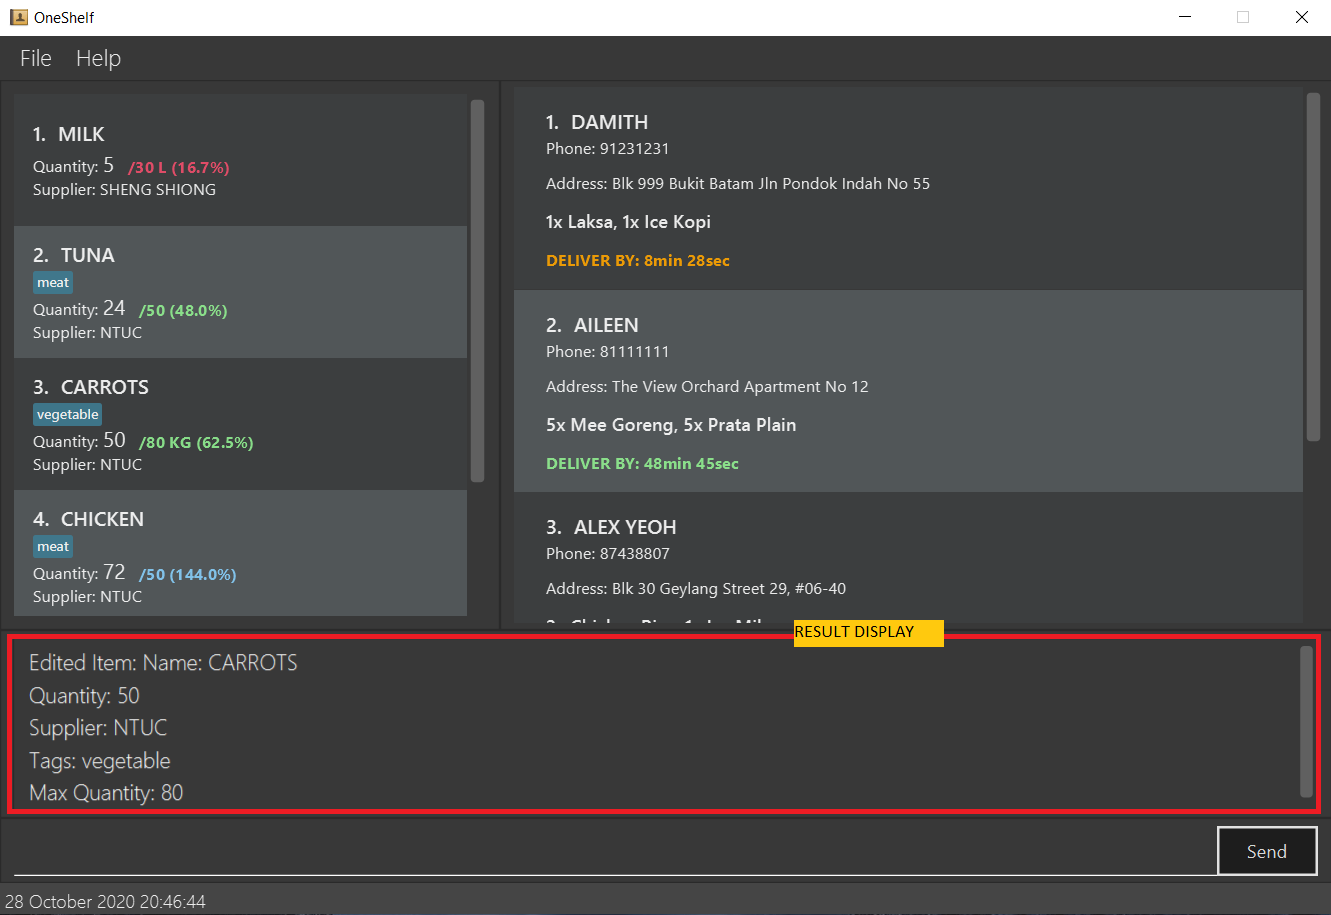
Figure 11: Edit Carrot Result
Example 2: edit-i 2 n/Spinach t/ using Figure 1 as the starting point.
-
Select the Command box and type in
edit-i 2 n/Spinach t/ -
Either press Enter on your keyboard or click Send to execute the command.
-
Success Message will be shown in the Result Display and the 2nd item will show up with its updated fields as shown in Figure 12.

Figure 12: Edit Spinach Result
3.1.4b edit-d
Format: edit-d INDEX [n/NAME | p/PHONE | a/ADDRESS | o/ORDER | by/TIME]
Examples:
-
edit-d 1 n/AARON p/91111233
Edits the name and phone number of the 1st item to beAARONand91111233respectively.
3.1.5 Locating items or delivery by keywords: find-i or find-d
Finds items or deliveries whose attributes contain any of the given keywords.
3.1.5a find-i
Format: find-i [n/NAME | s/SUPPLIER | t/TAG…]
Pointers to take note when finding an item:
- The search is case-insensitive. e.g
chickenwill matchCHICKEN - The order of the keywords does not matter. e.g.
Chicken steakwill matchsteak Chicken -
Name,SupplierandTagcan be searched - Only full words will be matched e.g.
chickewill not matchchicken - Items matching at least one keyword will be returned (i.e.
ORsearch). e.g.chicken steakwill returnchicken steak,steak beef - More than one Prefix can be specified (i.e.
ANDsearch). e.g.find-i n/Chicken s/NTUCwill return items matching name and supplier. - Finding multiple
Tagneeds to be seperated e.g.find-i t/meat t/perishable
Example:
-
find-i s/ntuc t/meatusing Figure 1 as the starting point.
-
Select the Command Box and type in
find-i s/ntuc t/meat. -
Either press ‘Enter’ on your keyboard or click Send to execute the command.
-
Success Message will be shown in the Result Display, and the number of matches will be shown. Refer to Figure 13:
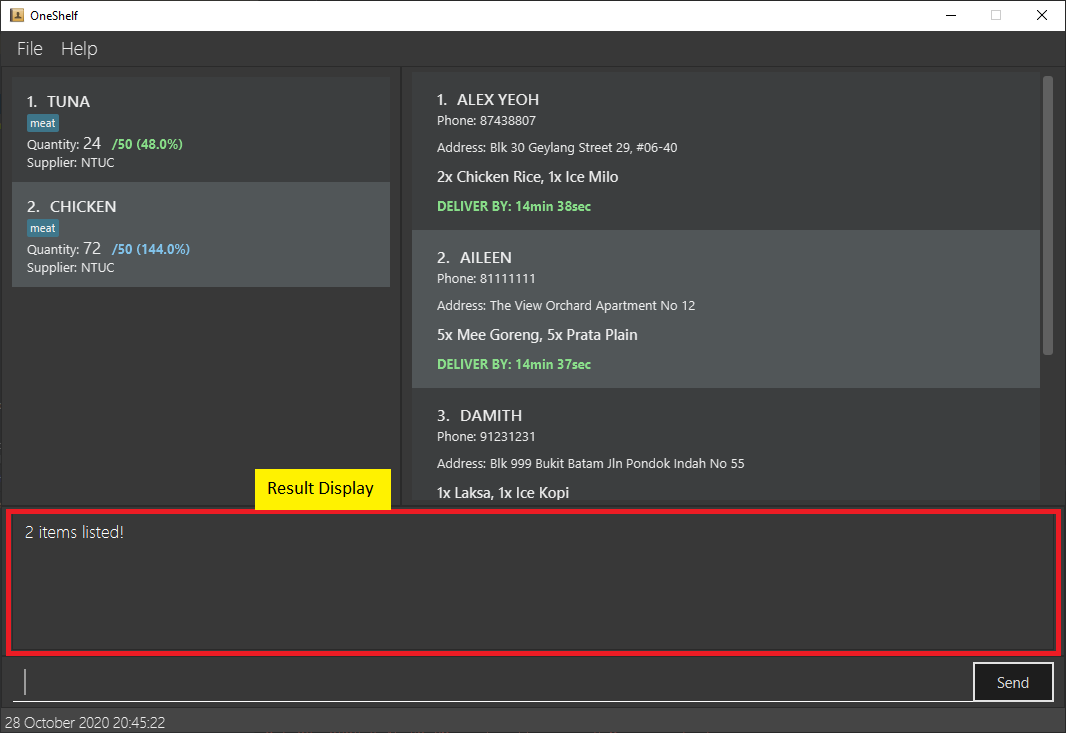
Figure 13: Find item supplied by NTUC in meat category
3.1.5b find-d
Format: find-d [n/NAME | p/PHONE | a/ADDRESS | o/ORDER]
Pointers to take note when finding a delivery:
- The search is case-insensitive. e.g
johnwill matchJOHN - The order of the keywords does not matter. e.g.
John Limwill matchLim John -
Name,Phone,Address,Ordercan be searched - Only full words for name will be matched e.g.
Bobwill not matchBobby - Any phone/address/order containing the search string within them will be matched.
- searching for “a/Holland V” will match “Holland Village”
- searching for “p/123” will match “12345678”
- Items matching at least one word in the search query will be returned.
e.g.
find-d n/Bernice Adamwill return deliveries with namesBernice Yeo,Adam Tan - More than one Prefix can be specified (i.e.
ANDsearch). e.g.find-d n/Bernice p/85783742will return delivery matching both name and phone.
Example:
-
find-d n/alex aileenusing Figure 1 as the starting point.
-
Select the Command Box and type in
find-d n/alex aileen -
Either press ‘Enter’ on your keyboard or click Send to execute the command.
-
Success Message will be shown in the Result Display, and the number of matches will be shown. Refer to Figure 14:
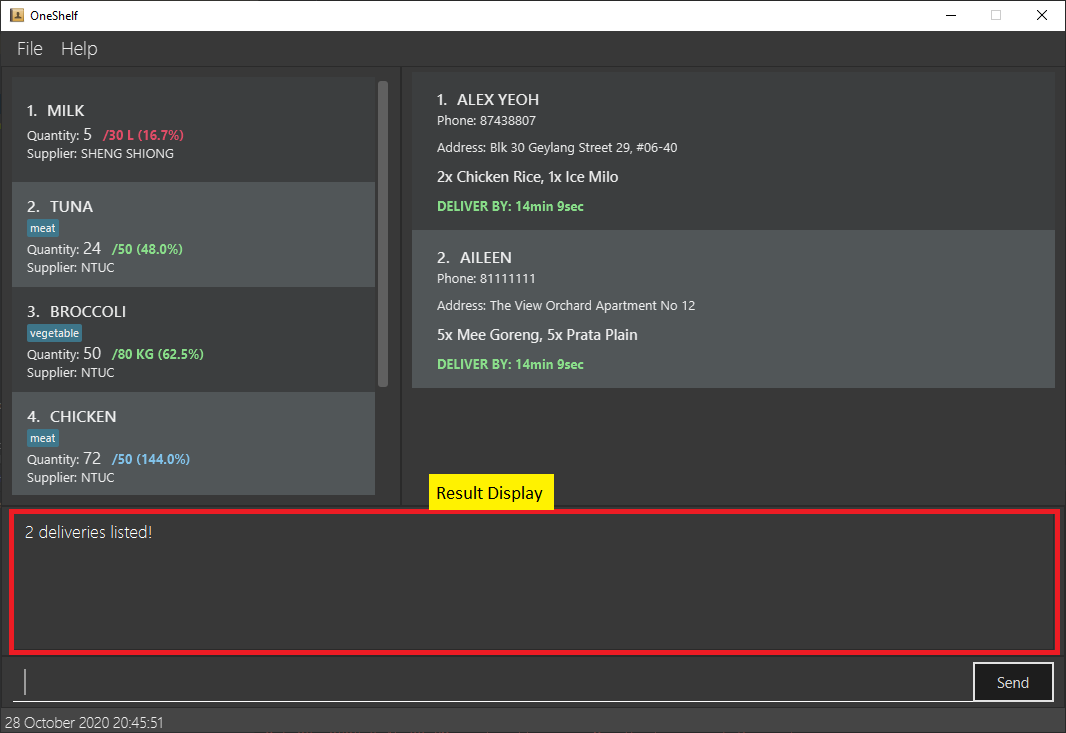
Figure 14: Find delivery by alex and aileen
3.1.6 Listing all items or delivery: list-i or list-d
After entering find-i or find-d, the placeholder in your application will only show the items or deliveries
that match your find KEYWORD. If you would like to show all the items and deliveries again,
list-i or list-d command would be useful.
Format: list-i or list-d
Example:
-
list-iusing the result of find example as a starting point.
-
Select the Command Box and type in
list-i. -
Either press ‘Enter’ on your keyboard or click Send to execute the command.
-
Success Message will be shown in the Result Display, refer to Figure 15:

Figure 15: List inventory items
3.1.7 Deleting an item or delivery: delete-i or delete-d
Deletes an item or delivery from inventory book or delivery book respectively. Delete command is especially useful for delivery as you would often need to delete a pending delivery once it has been delivered.
Format: delete-i INDEX or delete-d INDEX
Pointers to take note when deleting an item or delivery:
- Deletes an item or delivery at the specified
INDEX. - The index refers to the index number shown in the displayed item/ delivery list.
- The index must be a positive integer 1, 2, 3, …
Example 1:
-
Assume by entering
list-i, we have the following inventory items as shown in Figure 16: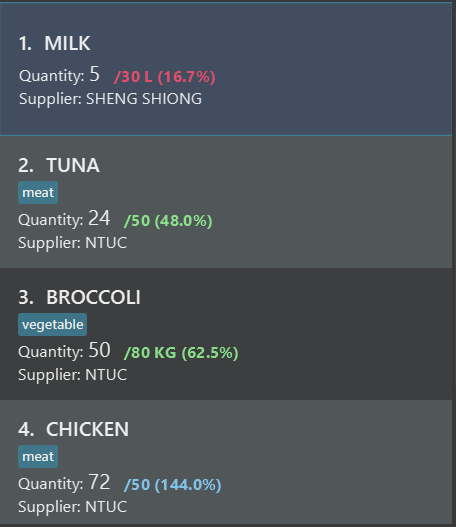
Figure 16: Before deleting index 2
-
Enter
delete-i 2which will delete the 2nd INDEX in the inventory book. The expected result should be as shown in Figure 17: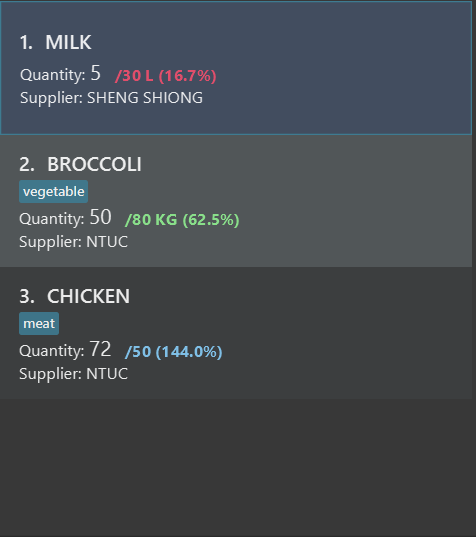
Figure 17: After deleting index 2
delete-d behaves similarly to delete-i, but deletes a delivery instead of an inventory item
3.1.8 Clearing all entries: clear-i or clear-d
Clears all entries from the Inventory/ Delivery book.
Format: clear-i or clear-d
3.1.9 Undo last command: undo
Undoes the previous command by reverting the current data displayed to the state it was in before the last command was executed.
Format: undo
Pointers to take note about undo:
- If there is a previous state available, the current state is reverted to that state
- If the current state is the earliest possible one, it shows a message informing the user that there is nothing more to undo
- The maximum number of previous commands you can undo is 20
Example 1: undo using Figure 1 as the starting point.
-
Select the Command box and type in
clear-i -
Either press Enter on your keyboard or click Send to execute the command.
-
Success Message will be shown in the Result Display, refer to Figure 18:
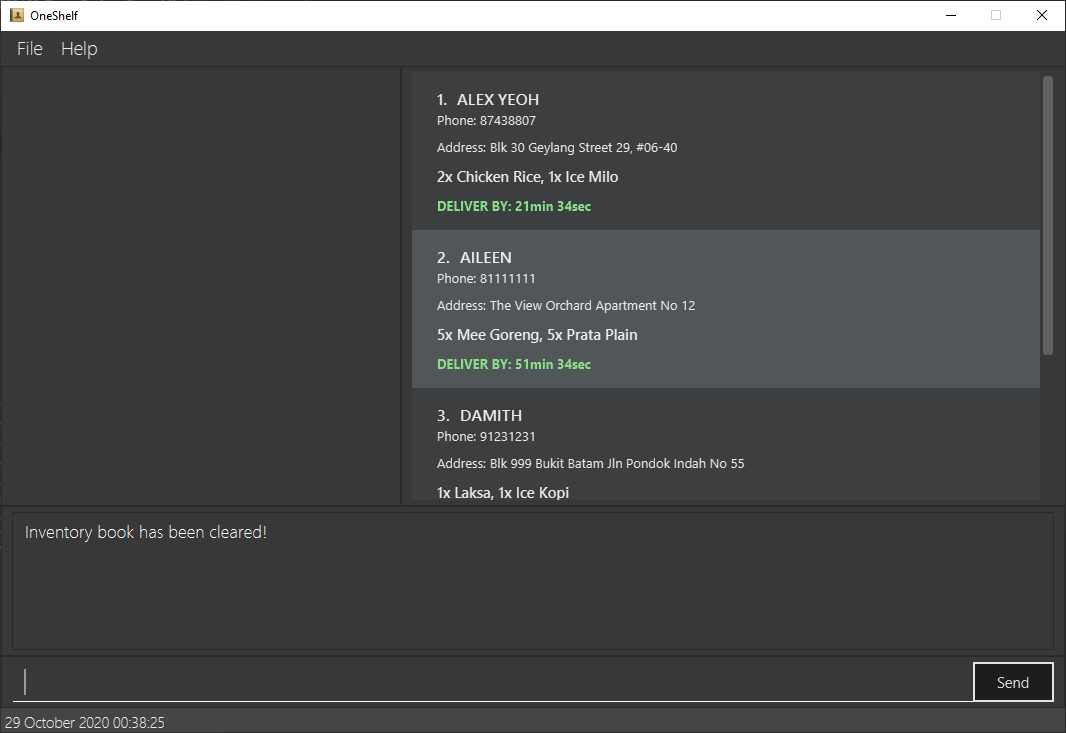
Figure 18: Clear all items
-
Select the Command box and type in
undo -
Repeat step 2
- You should now see the same items as appearing in Figure 1
3.1.10 Redo last command: redo
Redoes the last undone command by reverting the current data displayed to the state it was in before the last undo command was executed.
Format: redo
Pointers to take note about redo:
- If there is an undone state available, the current state is reverted to that state
- If the current state is the latest possible one, it shows a message informing the user that there is nothing more to redo
- After any command that changes the state of data (such as add, clear, delete, edit), the new state becomes the latest state
(i.e. the previous undo commands are “forgotten” and
redowill have no effect)
Example 1: redo using Figure 1 as the starting point.
-
Follow steps 1 - 4 of Example 1 for the
undocommand -
Select the Command box and type in
redo -
Either press Enter on your keyboard or click Send to execute the command
-
You should now see the items cleared again, as shown in Step 2 of Example 1 of the
undocommand.
3.1.11 Exiting the program: exit
Exits the program.
Format: exit
3.2 General Features
3.2.1 Saving the data
OneShelf data are saved in the hard disk automatically after any command that changes the data. There is no need to save manually.
3.2.2 Scrolling through command history
OneShelf commands are traversable (up to 20 commands) much like Window’s command prompt. By pressing the arrow up key traversing you’re able to traverse previous commands and by pressing the arrow down key you’re able to traverse into next commands.
3.2.3 Sorting
3.2.3a Sorting Inventory Items
- Inventory items are sorted based on percentage of quantity in ascending order.
- If the maximum quantity does not exist for that particular item then the item will be located at the end of the list.
- If 2 items have the same quantity, they are then sorted lexicographically.
3.2.3b Sorting Pending Deliveries
- Pending deliveries are sorted based on deliver by timing ie. delivery by.
3.3 Coming Soon
3.3.1 Statistics [Coming Soon]
Prints the total amount of delivery and reservation for the day
3.3.2 Scheduling [Coming Soon]
Allows user to know when to do restocking
3.3.3 Prices of items [Coming Soon]
Look up prices on a ‘supplier’ database
3.3.4 Notification [Coming Soon]
Notify the user if a certain stock is below threshold
4. FAQ
Q: How do I transfer my data to another Computer?
A: Install the app in the other computer and overwrite the empty data file it creates with the file that contains the data of your previous Inventory/ DeliveryBook home folder.
Q: I am unable to open up the application by double clicking on oneshelf.jar file, what should I do?
A: If double clicking does not work, you may use the command prompt to open OneShelf.
You may refer to the video of installation guide.
Q: Help! I’ve accidentally typed clear-i or clear-d and wiped all my data!
A: Use the Undo Command to reset your data back.
5. Command Summary
5.1 General Commands Summary
| Action | Format, Examples |
|---|---|
| Get help to start off |
help start or press F1 or use GUI help menu at the top left |
| Get help summary |
help summary or press F2 or use GUI help menu at the top left |
| Undo last command | undo |
| Redo last undone command | redo |
| Exit command | exit |
5.2 Inventory Summary
| Action | Format, Examples |
|---|---|
| Add to Inventory |
add-i n/NAME q/QUANTITY [s/SUPPLIER] [max/MAX_QUANTITY] [metric/METRIC] [t/TAG]... e.g., add n/Chicken q/3 s/ShengSiong t/Poultry
|
| Clear from Inventory | clear-i |
| Delete from Inventory |
delete-i INDEXe.g., delete 3
|
| Edit Inventory |
edit-i INDEX [n/NAME | q/QUANTITY | s/SUPPLIER | max/MAX_QUANTITY | t/TAG…] e.g., edit 1 n/Chicken q/50
|
| Find in Inventory |
find-i [n/NAME | s/SUPPLIER | t/TAG…] e.g., find-i s/ntuc t/meat
|
| List Inventory | list-i |
| Remove from Inventory | remove-i INDEX q/QUANTITY |
5.3 Delivery Summary
| Action | Format, Examples |
|---|---|
| Add to Delivery |
add-d n/NAME p/PHONE a/ADDRESS o/ORDER [by/TIME] e.g add-d n/Alex Yeoh p/87438807 a/Blk 30 Geylang Street 29, #06-40 o/2x Chicken Rice, 1x Ice Milo by/15
|
| Clear from Delivery | clear-d |
| Delete from Delivery |
delete-d INDEXe.g., delete 3
|
| Edit Delivery |
edit-d INDEX [n/NAME | p/PHONE | a/ADDRESS | o/ORDER | by/TIME] e.g., edit 3 n/AARON p/91111233
|
| List Delivery | list-d |
| Find in Delivery |
find-d [n/NAME | p/PHONE | a/ADDRESS | o/ORDER] e.g., find-d n/alex aileen
|
6. Glossary
- Item: Restaurant’s inventory item which can be restaurant materials (i.e fork, spoon, chair) or ingredients (i.e milk, cheese)
- Delivery: Delivery order that has yet to be delivered out from the restaurant
- Book: There are 2 types of book, namely: Inventory Book and Delivery Book which stores the data of your inventory items and pending deliveries respectively
- Index: The number indicated for each particular inventory item or pending delivery in the list.